Air Compressor Drain Valve Guide: Draining, Replacing, and Upgrading
The air compressor drain valve is the small fitting at the bottom of your tank, and it is the cheapest part on the machine doing the most important job. Every time you compress air, you also compress the water vapor that was floating in it. That vapor condenses into liquid, and while most of it blows out through your air line, roughly 10% settles at the bottom of the tank and stays there. That standing water, sitting against bare steel with plenty of oxygen around, rusts the tank from the inside out. The drain valve is how you get it back out before it does any damage.
This guide covers the part most pages skip: not just how to drain the tank, but how to replace a valve that has corroded shut, how to figure out what thread you need, and whether an automatic drain is worth the money for the way you actually use your compressor.
Why draining matters more than people think
Water plus oxygen plus steel equals rust. As rust eats into the tank wall, it thins the metal. A tank wall is rated to hold a specific pressure, and a wall that has been quietly corroding for years may no longer be able to. When a pressurized steel tank fails, it does not leak politely; it can rupture. This is why every major manufacturer and federal safety guidance treat tank drainage as a safety task, not a housekeeping chore. OSHA’s air receiver standard requires a drain at the lowest point of every receiver so accumulated moisture can be removed (see OSHA 1910.169), and Quincy Compressor, a major US builder, lays out the rust problem plainly in their guide to avoiding rust.
The valve sits at the lowest point of the tank for one reason: gravity pulls the water there. Open the valve and the water, pushed by tank pressure, blows out. The whole job takes about 30 seconds.
How often to drain
For a portable or garage compressor, the simple rule is drain it after every use. If you run it hard, or you live somewhere humid, drain it daily even on days you barely touch it. Humid air carries more water, so a shop in Houston in August will pull far more condensate than the same machine in dry high-desert air.
A quick routine that works:
- Let the tank cool, then drain while there is still a little pressure left so the air helps push the water out (more on safe pressure below).
- Tip portable tanks slightly toward the valve so the last of the water runs to it.
- Watch what comes out. Clear water is normal. Brown, gritty, or rusty water means corrosion is already underway, and you should drain more often and inspect the tank.
Identify your drain port before you buy anything
Most replacement valves thread straight in, but only if you match the port. The standard drain port on portable and small shop compressors is 1/4” NPT. Some larger tanks use 3/8” NPT, and small bleeder or check fittings can be 1/8” NPT.
Here is the trick competitors assume you already know: NPT is named by the pipe size, not the size you measure. A 1/4” NPT male thread measures about 1/2” across the outside with a tape measure. So if you put a tape on the threads of your old valve and read roughly half an inch of outer diameter, you have a 1/4” NPT port. Measure first, then order. Matching the pressure rating matters too; do not put a low-rated valve on a tank that runs at higher pressure.
The failures people actually search for
Drain valves fail in two predictable ways, and both show up constantly in garage and machinist forums.
The valve is seized shut and will not drain. Rust builds up inside the petcock and locks it. Do not force a brittle, corroded valve with a long cheater bar; you can snap it off in the tank. Drop the tank to low pressure, give the threads and the valve stem a soak with penetrating oil, let it sit, and work it gently back and forth. If it will not free up, the fix is replacement, not heroics.
The valve corroded and will not seal, so the tank will not hold pressure. The compressor runs and runs but pressure bleeds straight out the drain. There is nothing to repair here; the sealing surface is gone. Replace the valve.
In both cases the popular DIY move is the same: throw away the stock petcock and put in a quarter-turn ball valve. A ball valve opens fully with a flick of the lever, clears debris better than a narrow petcock, and is far less likely to seize. If your stock drain has been a recurring headache, that swap is the upgrade most owners reach for first.
Manual vs automatic: which drain suits you
There are four real options. The right one depends on how often you forget to drain and how much you run the machine.
- Manual petcock or drain cock. Cheapest, simple, reliable when you remember it. The whole weakness is memory: forget for a few weeks and rust starts. Fine for a hobbyist who drains religiously. Common replacements include the Powermate 1/4” NPT Tank Drain Valve (072-0001RP) and the Campbell Hausfeld 1/4” Drain Cock (GR001400AJ). The AES Industries 1/4” NPT replacement ships with sealant already on the threads.
- Ball valve swap. Still manual, still relies on you, but vastly easier to operate and far more resistant to seizing. The Compressor Source 1/4” male NPT ball-valve-style drain petcock is the part buyers ask about for this. Best low-cost upgrade for anyone whose petcock keeps clogging.
- Float / mechanical auto drain. Opens on its own when condensate reaches a set level, no electricity and no timer needed. The Wilkerson XB3-04-M00B is a floatless internal-piston version: 1/2” NPT, 200 PSI max, and it cycles roughly every 10 to 20 PSIG of pressure drop as the compressor runs. Good for a shop that wants hands-off drainage without wiring anything.
- Timer / electronic solenoid auto drain. A solenoid valve opens on a schedule you set. Typical units let you dial an OFF interval of about 0.5 to 45 minutes and an ON discharge of about 0.5 to 10 seconds, and the good ones include a built-in strainer, a manual TEST button, and an LED. The Wilkerson WDV3 series is one branded option; generic “EDV”-style timer drains are widely sold too. The trade-off: every cycle vents a puff of compressed air along with the water, so you pay for it in wasted air.
- Zero-loss / no-loss drain. A reservoir fills with condensate and a level sensor dumps only the water, never venting compressed air. It is the most efficient and the most expensive, and it earns its keep on a compressor running long hours where vented air actually costs money.
Quick read on who each suits: a weekend hobbyist is well served by a manual valve or a ball-valve swap; a daily shop benefits from a float or timer auto drain; a high-runtime operation that cares about air cost looks at zero-loss.
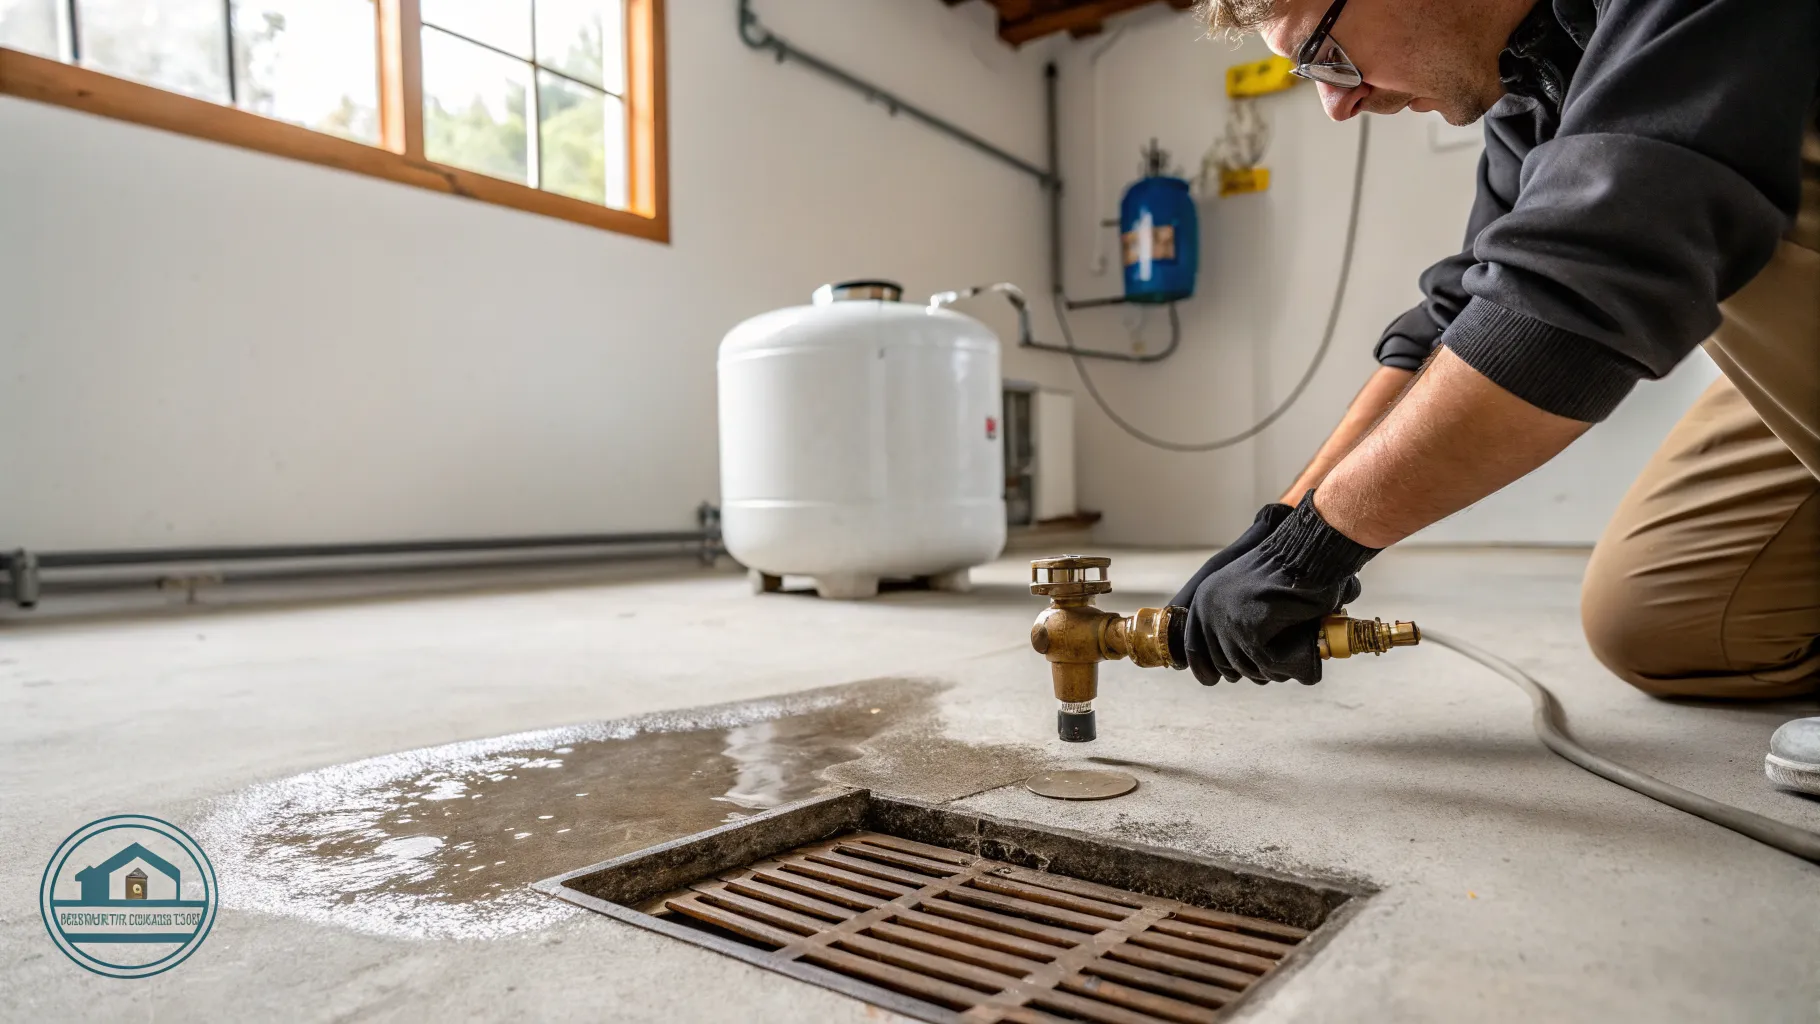
How to replace a drain valve safely
This is a straightforward thread-in job if you respect the pressure.
- Power off and unplug the compressor. No exceptions.
- Bleed the tank down through the existing valve. Work on the tank only at low residual pressure, never at full pressure. Removing a fitting from a fully pressurized tank is dangerous. Drain it down first.
- Unthread the old valve. Penetrating oil helps if it is corroded. Catch any last water.
- Seal the new threads. Wrap PTFE (Teflon) tape clockwise around the male threads, two or three wraps, or use pipe dope. If your replacement came with sealant pre-applied, like the AES unit, you can skip this.
- Thread it in and snug it. Hand-tighten, then bring it about one to two turns past finger-tight with a wrench. Stop there. Overtightening cracks the valve body or strips the port threads, and a cracked drain leaks forever.
- Pressurize and check. Run the compressor, then brush soapy water on the joint and watch for bubbles. No bubbles, you are done.
Don’t confuse the drain valve with the bleeder valve
Searchers mix these up constantly, so here is the distinction. The tank drain valve is at the bottom and removes water. The unloader bleed valve is part of the pressure switch; it vents the air sitting between the pump and the tank check valve when the compressor shuts off, so the motor can restart without fighting a head of pressure. A tank check valve keeps tank air from flowing back into the pump. If your compressor hisses briefly after it stops, that is the unloader bleeding, and it is supposed to do that. If water is the problem, the part you want is the drain valve at the bottom.
For more on keeping a tank healthy, see our air compressor maintenance basics, and if rust or moisture is your main worry, our notes on reducing moisture in compressed air cover dryers and filters that cut the water before it ever reaches the tank.
Frequently asked questions
How often should I drain my air compressor tank? For portable and garage units, drain after every use. In humid climates or with heavy daily use, drain every day even if you barely ran it. It takes about 30 seconds and it is the single best thing you can do to keep the tank from rusting.
What thread size is an air compressor drain valve? Most portable and small shop tanks use 1/4” NPT. Larger tanks may use 3/8” NPT, and small bleeder or check fittings can be 1/8” NPT. A 1/4” NPT male thread measures about 1/2” across the outside with a tape measure, so measure your old valve before ordering.
Do I have to release all the air before replacing the valve? Power off and unplug the unit, then bleed the tank down to low residual pressure through the existing valve before you remove anything. Never unthread a fitting from a fully pressurized tank. Working at low pressure is the safe way to do it.
My drain valve is stuck shut. How do I free it without breaking it? Drop the tank to low pressure, soak the valve and threads with penetrating oil, and work it gently back and forth. Do not muscle a corroded petcock with a long bar; it can snap off in the port. If it will not free up, replace it, and consider a quarter-turn ball valve so it does not seize again.
Why won’t my tank hold pressure after the drain corroded? Can I just replace the valve? Yes. If the drain valve corroded past the point of sealing, air leaks straight out and the compressor never builds pressure. There is nothing to repair on the sealing surface, so thread in a new valve of the same port size and pressure rating, seal the threads with PTFE tape, and the tank will hold again.
Is an automatic drain worth it? If you forget to drain or run the compressor daily, yes. A float drain is hands-off with no wiring. A timer drain is adjustable but vents a little compressed air every cycle. A zero-loss drain wastes no air but costs the most and pays off mainly on high-runtime machines. A hobbyist who drains by hand often does fine with a manual valve or a ball-valve swap.
Buying a replacement? Match the port size and pressure rating first, then check current price on a quality 1/4” NPT valve or ball valve before you order.
More from Air Compressor Mag
Best Portable Air Compressors: Picks by Job (2026)
Real portable air compressor picks by job, from tire inflation to framing, with the CFM at 90 PSI, tank size, and noise specs that actually decide it.
CFM Explained: How to Choose a High CFM Air Compressor for Your Tools
How to read CFM ratings and pick a high CFM air compressor: the 90 PSI standard, SCFM, a tool chart, and when you need 10, 20 or 50 CFM.
Air Compressor Tank Guide: Sizing, Care, and Replacement
An air compressor tank guide covering how to size a tank by CFM, keep it from rusting, and know when it is time to replace the receiver.